I’ve always been a fan of marginalia.1 Likewise, I’ve been known to use a post-it or two (or five) from time to time. Why? Sometimes it’s just easier to communicate when you keep your visual options open.2
Such was the case the other day, when I had a question about how best to approach a problem in GitHub. (I’m not going to explain it in words, because it’s hard, and I’m lazy, and that’s how I ended up here in the first place!)

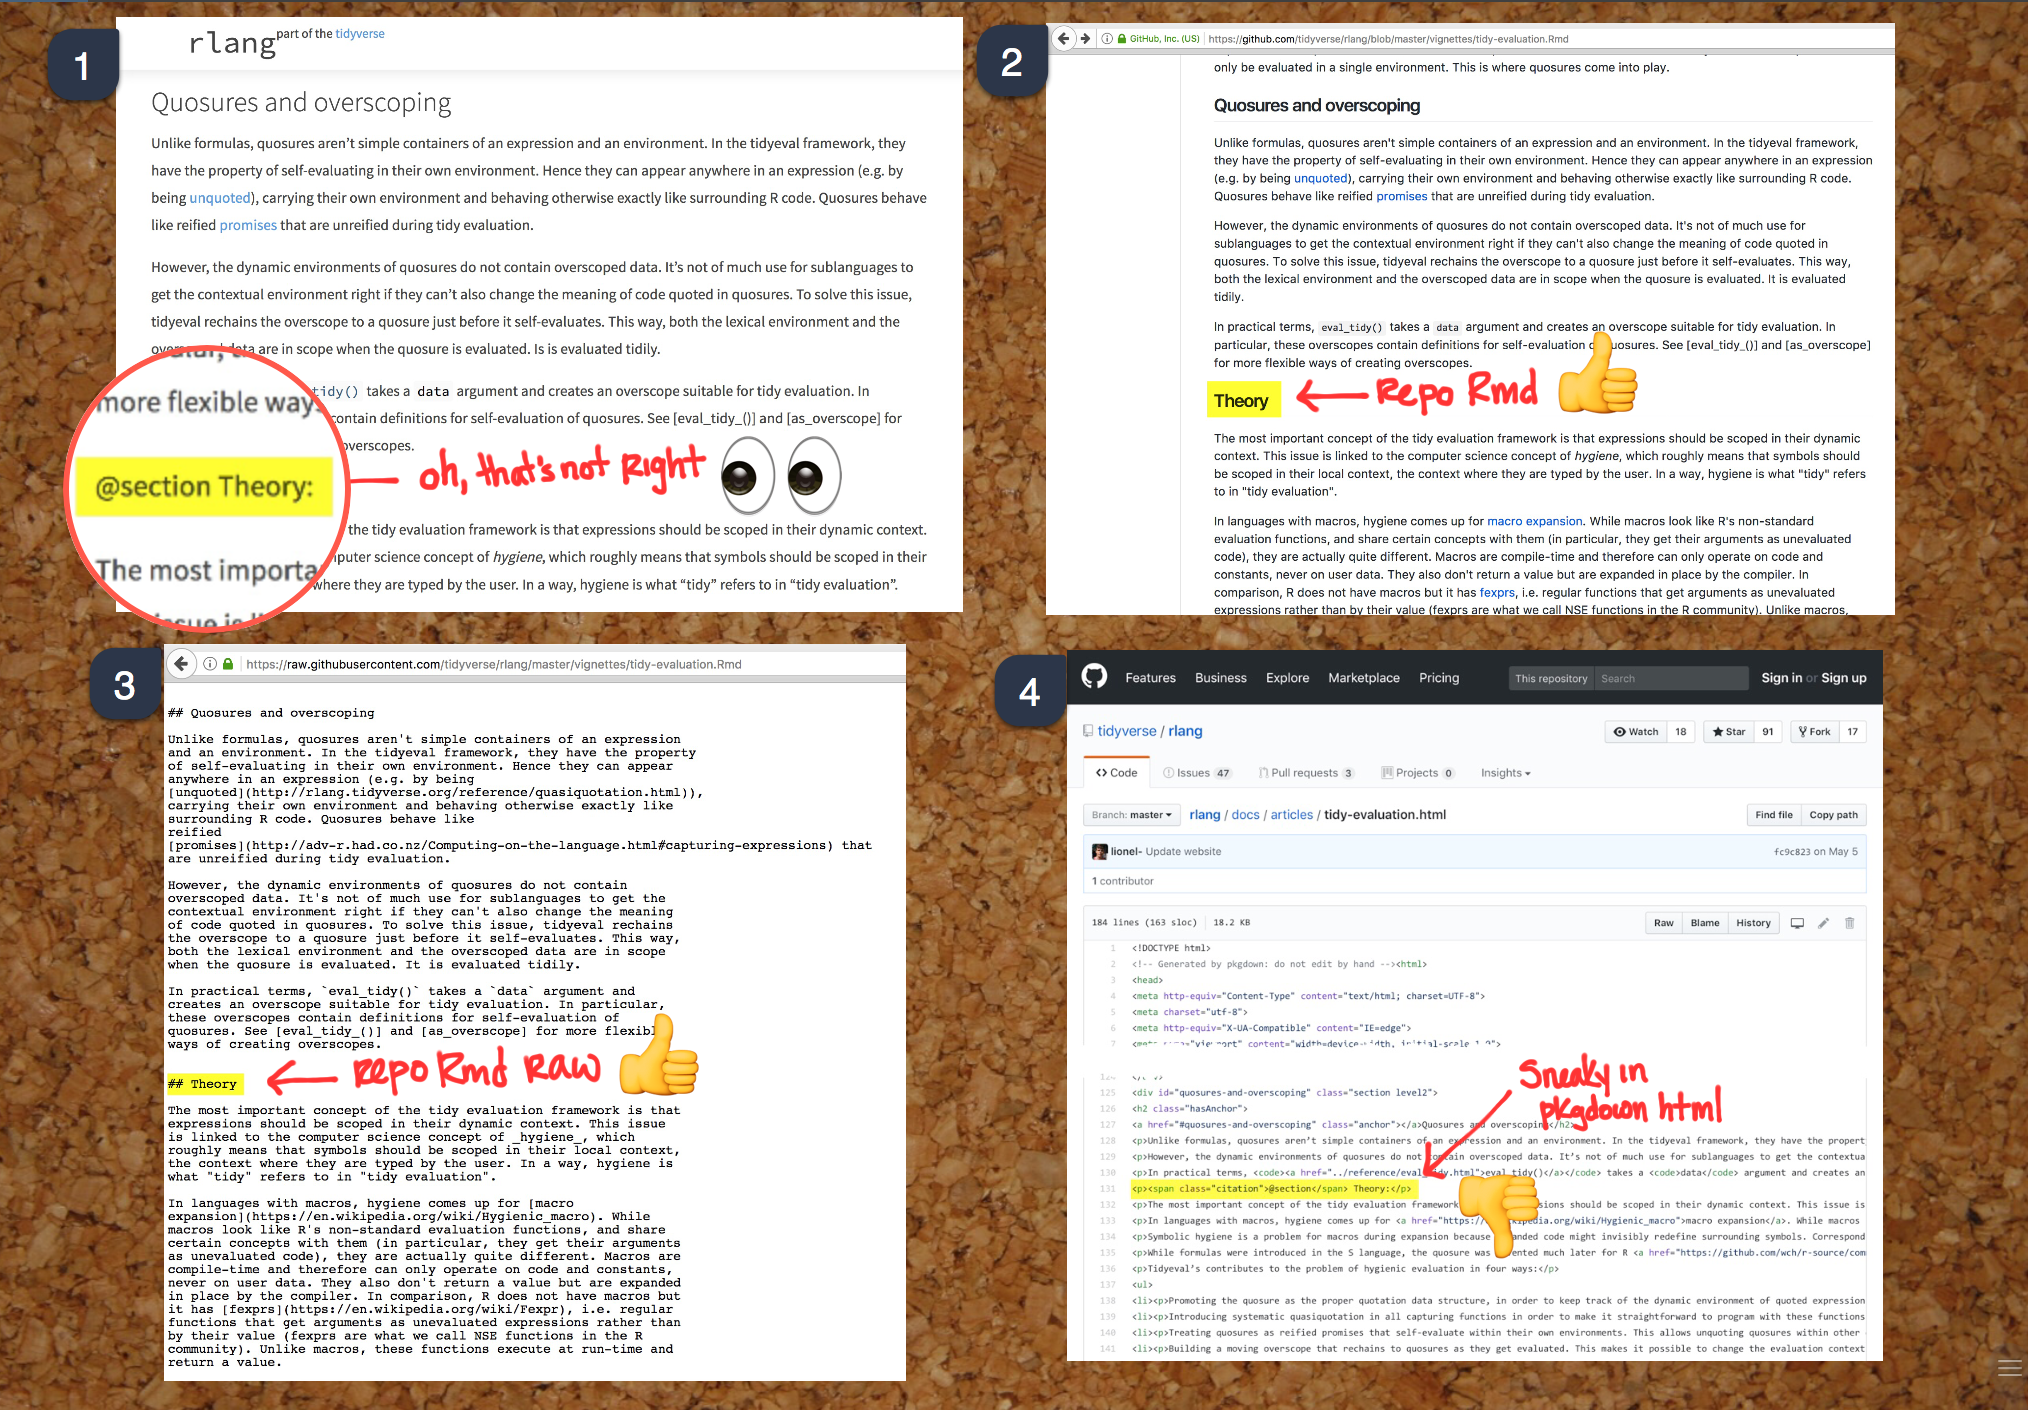
Though I tweeted my question, the visual aid would have been helpful (at least to me) regardless of the 140-character limit.
Rick Pack asked for a “how’s it made” on this little four-up layout.
Forgive me but have you written anything about creating an image like this one? 4 screens, thumbs up, zooming...so informative.
— Rick Pack (@rick_pack2) August 13, 2017
Though I warned all interested parties that my “methods” are haphazard and inconsistent, Stefanie Butland said to write it up anyway.
Write one post on your process and another once you've "perfected" it. Ppl wd benefit from knowing how your powerful brain works
— Stefanie Butland (@StefanieButland) August 13, 2017
So, consider yourself warned! ⚠️
Step 1: Screenshots 💻
I actually do most of these on my iPad, but there’s no emoji for that. You can also do this on your computer (Mac is Command-Shift-3) with or without third-party software.3
Crop as necessary to avoid visual overload. ✂️
Step 2: Montage/Collage
So, this is where things get a bit free-form. Behold the collection of photo/art/note apps I have amassed on my iPad over the past 7 years!

I’m honestly not even sure that all of these work anymore. But, through some combination of loss aversion, and certain little things I like/dislike about each one, they continue to hang out on my iPad.
Of late, I’ve been into Inkflow Plus for this part. Though, again, I’m sure you can do many of the same things with other applications.

- It’s not not a collage app, doesn’t restrict or dictate anything about aspect ratio, and lets you resize/move each image individually.
- You can use “custom stationary,” which basically means any image you want can be the background (e.g. corkboard).
- You can draw on the photos, which is not an option in other apps I’ve tried.4
Step 3: Annotation
As mentioned above, you can draw on photos in Inkflow Plus (something I didn’t figure out until recently). However, my favorite app for this is YouDoodle. YouDoodle and InkflowPlus both let you 🔎 zoom as much as you like, and don’t make you use a special pane of any sort for that 👍. YouDoodle has a “draw in straight lines”5 option that InkFlow doesn’t. So…🤷
Step 4: Zoom
In this case, I happened to be on my computer, so I did the zoom in Snagit. However, I usually do this in iOS Markup, which you can access by editing a photo on your iPhone or iPad.

Step 5: 🙂😎😝
Optional (and likely extraneous) is the addition of emoji. I haven’t found an app that I really like for this task yet. These are the two that I hate least (Photo Editor and Insta Emoji).6

One of them restricts your aspect ratio, often resulting in my adding emoji upside down. The other one forces you to scroll through every possible permutation of the people emoji to get to the one you want. My most-used emoji is 📦, which is on page 51. All of the emoji reload each time, so it’s not fast, either. However, the aspect ratio thing means that, after all my hard work, I’d be cutting something out just to add a dumb smiley face 😡!7
Fin 🎉
Ta-da! There you have it: my crazy, inefficient workflow through which I can make code changes look like they’ve been requested by a 5 year-old with a crayon! 🖍
Though I resented it at the time, it was probably a good thing that they only let you enter the special collections library with a golf-✏️ in college.↩
I could literally write a book (or 📚) discussing the reasons why…and Elijah Meeks and I totally will be doing just that, someday.↩
I use Snagit sometimes (which costs 💸), but that’s mainly for bells and whistles not used in this particular example.↩
You can also do this with the pre-installed Markup app on iOS now.↩
Not what it’s actually called, I’m sure.↩
For some reason I can’t find Photo Editor now. 😳↩
As you can tell, I’m not bitter about it or anything… Seriously, if you have a better app for this, let me know 🙏!↩